Translate
hi ..
1. Hardware required
- Arduino
- L293D Motor Driver
- DC-MOTOR
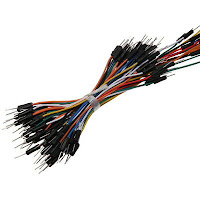
- Wires
2. L293D IC Pin Out
The L293D component is a power bridge composed of several transistors and relays that can activate the rotation of an engine.
The L293D is a double H-bridge, which means it can be used to control four separate motors (in one direction) with its four channels.
It is important to note that the L293D can deliver a maximum of 600mA, so please choose your engines accordingly.
The L293D is a 16 pin IC, with eight pins, on each side, to controlling of two DC motor simultaneously. There are 4 INPUT pins, 4 OUTPUT pins and 2 ENABLE pin for each motor.
1. Hardware required
- Arduino
- L293D Motor Driver
- DC-MOTOR
- Wires
 |
| L293D |
 |
| DC-MOTOR |
 |
| Wires |
 |
| Arduino UNO |
2. L293D IC Pin Out
The L293D component is a power bridge composed of several transistors and relays that can activate the rotation of an engine.
The L293D is a double H-bridge, which means it can be used to control four separate motors (in one direction) with its four channels.
It is important to note that the L293D can deliver a maximum of 600mA, so please choose your engines accordingly.
The L293D is a 16 pin IC, with eight pins, on each side, to controlling of two DC motor simultaneously. There are 4 INPUT pins, 4 OUTPUT pins and 2 ENABLE pin for each motor.
Pin 1: When Enable1/2 is HIGH, Left part of IC will work, i.e motor connected with pin 3 and pin 6 will rotate.
Pin 2: Input 1, when this pin is HIGH the current will flow though output 1.
Pin 3: Output 1, this pin is connected with one terminal of motor.
Pin 4/5: GND pins
Pin 6: Output 2, this pin is connected with one terminal of motor.
Pin 7: Input 2, when this pin is HIGH the current will flow though output 2.
Pin 8: VSS, this pin is used to give power supply to connected motors from 5V to 36V maximum depends on Motor connected.
Pin 9: When Enable 3/4 is HIGH, Right part of IC will work, i.e motor connected with pin 11 and pin 14 will rotate.
Pin 10: Input 4, when this pin is HIGH the current will flow though output 4.
Pin 11: Output 4, this pin is connected with one terminal of motor.
Pin 12/13: GND pins
Pin 14: Output 3, this pin is connected with one terminal of motor.
Pin 15: Input 3, when this pin is HIGH the current will flow though output 3.
Pin 16: VCC, for supply power to IC i.e 5V.
Using the L293D with Arduino and 2 DC motors
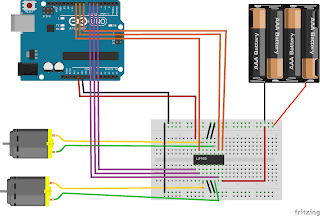
With a single L293D bridge and an Arduino we will be able to drive 2 DC motors independently of each other. If the power of your engines is low you can even use the 5V output of your arduino to power your DC motors.
Diagram to connect 2 engines to an arduino
DC-MOTOR
There are dozens of different DC motors: size, voltage, amperage, ...
A DC motor is an electromechanical converter for the bidirectional conversion of energy between an electrical installation traversed by a direct current and a mechanical device; depending on the source of energy . To put it simply, it means that a DC motor will be able to convert electricity into mechanical energy. DC motors have the particularity of being able to operate in both directions, depending on the way the current is subjected to it.
 |
| DC-MOTOR |
The code arduino :
EXAMPLE 1
//control the DC-MOTOR with L293D
//by mohammed.H
// arduino projects
#define Enable 5
#define DIRA 3
#define DIRB 4
int i;
void setup() {
// set pin direction
pinMode(Enable,OUTPUT);
pinMode(DIRA,OUTPUT);
pinMode(DIRB,OUTPUT);
}
void loop() {
//example 1
//back and forth
digitalWrite(Enable,HIGH);//enable on
for(i=0;i<5;i++)
{
digitalWrite(DIRA,HIGH);// one way
digitalWrite(DIRB,LOW);
delay(500);
digitalWrite(DIRA,LOW);//reverse
digitalWrite(DIRB,HIGH);
delay(500);
}
digitalWrite(Enable,LOW);//disable
delay(2000);
}
EXAPMLE 2
//control the DC-MOTOR with L293D
//by mohammed.H
// arduino projects
#define Enable 5
#define DIRA 3
#define DIRB 4
int i;
void setup() {
// set pin direction
pinMode(Enable,OUTPUT);
pinMode(DIRA,OUTPUT);
pinMode(DIRB,OUTPUT);
}
void loop() {
//example 2
//PWM example , full speed then slow
analogWrite(Enable,255);//enable on
digitalWrite(DIRA,HIGH);// one way
digitalWrite(DIRB,LOW);
delay(2000);
analogWrite(Enable,180);
delay(2000);
analogWrite(Enable,100);
delay(2000);
analogWrite(Enable,50);
delay(2000);
digitalWrite(Enable,LOW);
delay(2000);
}
//by mohammed.H
// arduino projects
#define Enable 5
#define DIRA 3
#define DIRB 4
int i;
void setup() {
// set pin direction
pinMode(Enable,OUTPUT);
pinMode(DIRA,OUTPUT);
pinMode(DIRB,OUTPUT);
}
void loop() {
//example 1
//back and forth
digitalWrite(Enable,HIGH);//enable on
for(i=0;i<5;i++)
{
digitalWrite(DIRA,HIGH);// one way
digitalWrite(DIRB,LOW);
delay(500);
digitalWrite(DIRA,LOW);//reverse
digitalWrite(DIRB,HIGH);
delay(500);
}
digitalWrite(Enable,LOW);//disable
delay(2000);
}
EXAPMLE 2
//control the DC-MOTOR with L293D
//by mohammed.H
// arduino projects
#define Enable 5
#define DIRA 3
#define DIRB 4
int i;
void setup() {
// set pin direction
pinMode(Enable,OUTPUT);
pinMode(DIRA,OUTPUT);
pinMode(DIRB,OUTPUT);
}
void loop() {
//example 2
//PWM example , full speed then slow
analogWrite(Enable,255);//enable on
digitalWrite(DIRA,HIGH);// one way
digitalWrite(DIRB,LOW);
delay(2000);
analogWrite(Enable,180);
delay(2000);
analogWrite(Enable,100);
delay(2000);
analogWrite(Enable,50);
delay(2000);
digitalWrite(Enable,LOW);
delay(2000);
}
In this video you know how to connect DC-MOTOR with L293D and control the direction and speed
the link of video
pleas subscribe !!! THANKS
https://www.youtube.com/watch?v=PyHHWcVvWL8
the link of video
pleas subscribe !!! THANKS
https://www.youtube.com/watch?v=PyHHWcVvWL8
Inscription à :
Publier les commentaires (Atom)


Aucun commentaire:
Enregistrer un commentaire